To make a bed canopies with your own hands can every person who wants to bring originality to their bedroom. Usually people try to install the most comfortable and at the same time cozy bed in their bedroom, which can have different styles.
However, a special atmosphere in the room creates a variety of decorative elements, one of which is a canopy. This product is very popular, it is used by designers when decorating rooms for both adults and children. The design of the canopy is simple, and you can make it with your own hands, following the instructions.
What is the purpose of a canopy?
A baldachin is an unusual canopy that surrounds the bed. It consists of a frame and a textile part, which is installed on it.
Such an unusual decoration of the interior was used in ancient times. The canopy first appeared in the East, and it was used to limit your personal space. In addition, these curtains in the best way protected from draughts.
Such a product and now has not lost its popularity. After all, it is not only a decoration, but also a functional object of the interior:
- creates a feeling of safety and comfort;
- protects from mosquitoes and other insects;
- allows in the summertime to keep cool air;
- in the morning, it protects from sunlight penetration;
- allows you to zoned sleeping space.
Disadvantages in the use of canopies
Despite the fact that the canopy is a decorative and functional product, it has some disadvantages:
- Dust constantly collects on the fabric, so it will have to be washed regularly. If you are not ready for this, it is better to abandon this idea, because any contamination – a medium for the development of pathogens. In addition, it is very dangerous for people with allergic reactions to dust.
- Many people find the process of care for a canopy too difficult, because we have to monitor the cleanliness of not only the fabric part, but also the frame, and wipe the dust under the ceiling does not want everyone.
- Such a decorative element visually hinders space, so it is definitely not suitable for miniature rooms.
- Since you will have to wash the material often, for a while above the bed will remain only the frame, which will stand out against the ceiling (the problem is solved with a changeable fabric part).

What textile to choose to make a canopy?
Regardless of what material the canopy is made of, it must be combined with the overall interior of the room. Therefore, and the fabric must be chosen, taking into account similar criteria:
- heavy materials such as jacquard, tapestry are best suited for the classic bedroom interior, they look expensive, so you can create a real royal bed;
- silk and satin are perfect for a baroque room;
- for the oriental interior can be made on the canopy different colored tassels;
- for the room in the modern style should not weigh the frame – it should be a weightless structure with transparent curtains.
In addition, it is necessary to take into account other nuances when choosing textiles:
The desired effect can be achieved not only through the structure of the material, but also through patterns. They can be combined with other textile elements of the interior.
The color of the material is also important. For a laconic interior, it is necessary to choose discreet monochrome fabrics. If you prefer a romantic style, it is better to buy the material in pink or red.
Making canopies with your own hands
In principle, it is enough to look at photos of canopies to choose the desired option and understand how to make it. Below we offer step by step instructions that will allow you to make different designs without mistakes.
Suspended version: step by step instructions
This is the most primitive design, which is suspended over the sleeping place.
In the process of work, we will need the following:
- measuring tape or tape measure (it depends on what you are used to working with);
- screwdriver;
- sewing machine;
- dowels and screws with hooks;
- a simple pencil;
- tape – 400 centimeters;
- any painted wooden strips – 2 pieces of 100 centimeters;
- material for the canopy.
Step 1. First of all we need to make a marking over the bed. To do this we need to know the length of the wooden slats. On the ceiling itself, we put marks on the places where the screws will be inserted – they must be parallel. That means you have to put two screws in each side. Between the rows of screws should be a space, on average it is about 50-70 centimeters. However, the exact value will vary depending on the width of the bed. For example, if the width of the bed is 150 centimeters, the distance between the slats will be 70 centimeters. For a two meters wide bed this distance can be increased up to 100 centimeters – here you also have to take into consideration your personal preferences.
Step 2: Now drill holes along these marks and fasten the screws there. Then to these fasteners we tie ribbons, so that there are loops.
Step 3. Now you need to take a textile with the edges trimmed and place it on a flat surface. Next, you should take exactly a whole piece of fabric with a height of two rooms, and plus another 20-30 centimeters to it. In the middle of this cut, you need to allocate a section of fabric, the width of which will be equal to the distance between the screws. Now add a few more centimeters to the resulting value, so that the canopy sags over the bed (usually at least 40 centimeters).
Step 4 Now according to these marks you need to sew the material. To do this, it is better to use a sewing machine, otherwise you will have to spend too much time on such work. This way we will have an opening for the slats. There will be only two pieces of wood in the textile section.
Step 5. As a result, we will have a canopy, which will be quite easy to fasten to the hinges. On the extreme parts of the ledges it is necessary to put caps, which have a decorative appearance, and thanks to them the fabric will not come off the ledge when it is used.
Step 6. Now you need to distribute the material on different sides of the bed, so that it hangs down beautifully.
On the same principle, you can also make a canopy in the form of a ring. This will require an ordinary metal hoop.
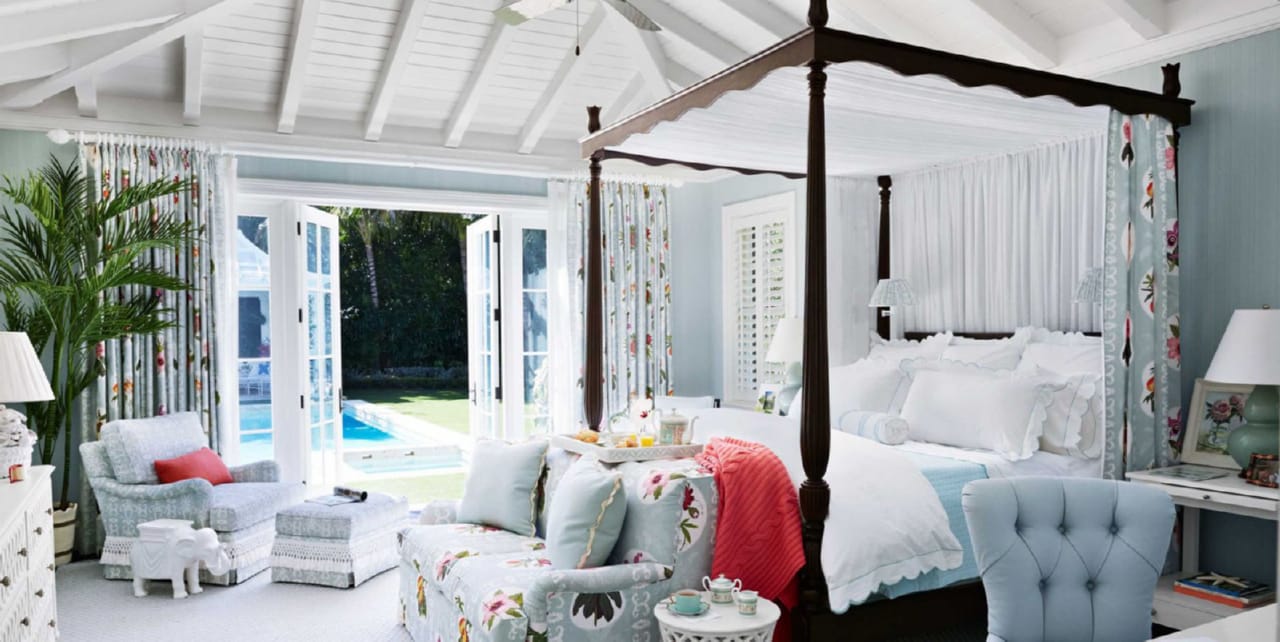
On four posts: step by step instructions
In this case, the textile part of the structure will be held on a wooden frame in the form of racks. Of course, to make such a product will need to spend more time, but the result will definitely please you.
In the process of work we will need the following:
- Stands made of wood. Their diameter will be 5,8×5,8 centimeters. It is desirable to buy ready-made material, in which there will be grooves to assemble the frame. A total of four uprights will be used.
- Four frames. At the same time, 2 of them should fully correspond to the parameters of the bed (length, width). The remaining frames should fit only in length. In this case, too, it is better to buy blanks with factory holes for connections.
- Construction glue.
- Fasteners.
- Plugs – 4 pieces.
- Wooden chops.
- Varnish for finishing.
- Fabric. On average, you will need about ten meters (it is necessary to distribute this amount on both sides).
The process of creating such a canopy is based on making a frame to attach the fabric. It can be made of any material, including plastic and metal. In our case, however, wood will be used.
Step 1. To begin with, we need to connect the vertical and transverse elements according to the principle of tongue and groove. To ensure that the frame is secure, we make additional fasteners with self-tapping screws. The design should turn out flat, which should be checked upon completion of the assembly.
Step 2. now this framework should be coated with varnish. In total you need to apply it in 3-4 layers, drying each one. If the bed itself has a dark color, then the frame can be painted with a stain, and only then with varnish. For such purposes, manganese will also work – mix a strong solution to get a dark cherry color of wood.
Step 3. Now you need to install this frame so that its corners rest against the bed.
Step 4. Finally, it is necessary to attach textiles to the resulting frame. Here you can show your creative abilities and make unusual drapery options.
Useful tips for beginners
The following recommendations may be useful for beginners in the process:
- When choosing textiles for the canopy, it should be taken into account that it should be about 20 centimeters more than indicated in the calculations. All these centimeters will go for bends and fasteners.
- Install the frame on the ceiling will be much easier, using hangers. On the wall, the system is installed with dowels.
- It is not necessary to make a full-fledged canopy, you can install a simplified version. To do this, first fix the bars above the sleeping place, and on them already hang ordinary curtains.
- Instead of solid loops, you can use fabric ribbons in the tone of the material of the canopy.
Buy or make your own hands?
Of course, any product can be purchased in the store. However, it is worth taking into account that ready-made options are not always suitable in the presence of a non-standard bed. In addition, you will have to spend more money.
It is also worth noting that a canopy is not a very popular interior object, so it will be difficult to find a store where a large variety of such products is presented.
Self-made construction – this is a great opportunity to save the budget. Here you will have the opportunity to buy fabric and any fittings to your taste. Nevertheless, this option is not suitable for people who do not have free time, because with some types of canopies will have to tinker.
To make a canopy with your own hands is not difficult, especially, there are quite simple options, with which even a beginner can cope. Otherwise, it is a great opportunity to decorate your bedroom, make it cozy and unusual.